The Minimalist Guide
Some developers are happy to follow whatever recipe a framework may give you (File > New Project > ASP.NET Web Application > With MVC, With Identity Auth, With Bootstrap, With…). While there is nothing wrong with that approach, in fact that is often a great place to start, that is not what this guide is about. In this guide, I want to take a minimalist approach to a variety of topics. Cut out all the cruft, and try and find the simplest possible implementation for various features. The hope is that exploring ASP.NET Core in this way I (and you) will gain a better understanding of how the bits and bytes that make up the framework fit together, leading to a better intuition for how to best use the framework to build web apps.
In this post, I want to try and find the simplest way to get going with routing. If you missed the previous post, check it out to see the details for how we did the initial project setup.
Where We Left Off
When we left off, we had an app that could spin up and return a simple hello world message.
public static void Main(string[] args)
{
    WebHost.CreateDefaultBuilder(args)
        .Configure(app =>
        {
            app.Run(async (context) =>
            {
                await context.Response.WriteAsync("Hello World!");
            });
        })
        .Build()
        .Run();
}
Obviously, we are going to need to do better than that to build something useful.
Attribute Routing
ASP.NET MVC has allowed for a few different flavors of routing over the years. Of them, my favorite is Attribute Routing. I appreciate the way it keeps your routing configuration close to the method that actually implements the route’s logic. So, what is it going to take to get attribute routing working with our app? The good news is, not a lot.
When we setup our app, we tried to strip out everything but the essentials. In doing so, we removed the MVC parts of ASP.NET, so we will need to add some of that back. Specifically, we will need to add the Microsoft.AspNetCore.Mvc.Core nuget package. Most importantly, this is going to give us the bits for attribute routing and model binding.
<Project Sdk="Microsoft.NET.Sdk.Web">

  <PropertyGroup>
    <TargetFramework>netcoreapp2.1</TargetFramework>
  </PropertyGroup>

  <ItemGroup>
    <PackageReference Include="Microsoft.AspNetCore" Version="2.1.1" />
    <PackageReference Include="Microsoft.AspNetCore.Mvc.Core" Version="2.1.2" />
  </ItemGroup>

</Project>
Now that we have all the right bits, we can configure the routing for our app. There are a couple of extension methods that do all the heavy lifting.
public static void Main(string[] args)
{
    WebHost.CreateDefaultBuilder(args)
        .ConfigureServices(services =>
        {
            services.AddMvcCore();
        })
        .Configure(app =>
        {
            app.UseMvc();
        })
        .Build()
        .Run();
}
You will notice that we are now hooking into the ConfigureServices extension point, where we call AddMvcCore on the supplied IServiceCollection. This adds the “minimum essential MVC services” to support our application. Namely, it does not include anything to enable things like authorization, validation, or formatters (we will get more into formatters in a minute), just the essentials.
You will also notice that our Configure method has changed. Instead of setting up the Run method to always return “Hello World!”, we are calling the UseMvc extension method to get everything wired up. This extension method will inject all that MVC routing goodness into the ASP.NET request execution pipeline.
Our First Route
Now that all the configuration has been taken care of, lets get to work setting up our first route. Given that this is an MVC app, we are going to need a controller, right? Well not necessarily. ASP.NET Core 2.1 introduces a nifty new attribute, ApiController. Any class can be decorated with this attribute, you are no longer required to extend ControllerBase or ApiController. In fact, you can create your own base class. When the UseMvc method is called while your app is starting up, classes decorated with the ApiController attribute will be discovered, and any methods decorated with a Route attribute will be registered.
Lets give it a shot.
[ApiController]
public class Api
{
    [Route("Test")]
    public string Test()
    {
        return "Hello World!";
    }
}
Here we have what is basically a POCO class, decorated with a couple of attributes. Now when we start up our app and navigate to /Test…
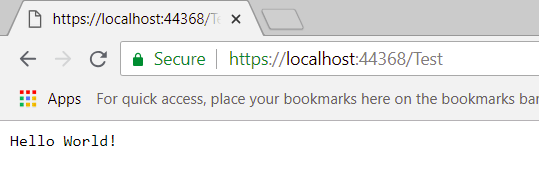
It works!
A More Complex Response
Lets try something a little more interesting. Instead of returning a string, lets return something a little more complex.
public class Person
{
    public string FirstName { get; set; }
    public string LastName { get; set; }
}
OK, thats not terribly complex, but it will be enough to illustrate a point. Lets add a new method to our API that can return a person.
[Route("Test2")]
public Person Test2()
{
    return new Person
    {
        FirstName = "Test",
        LastName = "Person"
    };
}
When we navigate to /Test2, we get a much lest satisfying result.
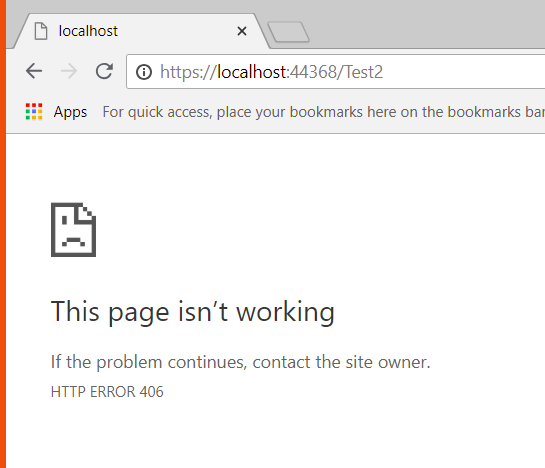
The problem is, in our minimalist setup, we have not included anything to handle formatting complex response types, hence the HTTP 406 error. Returning a simple string works fine, but an object does not.
JSON Formatting
The defacto format for data on the web today is JSON. Lets see about adding JSON support to our API so that we can start working with complex data types. Again, since we have only included the essentials thus far to get our app running, we will need to pull in an additional package to enable support for JSON formatting, Microsoft.AspNetCore.Mvc.Formatters.Json.
<Project Sdk="Microsoft.NET.Sdk.Web">

  <PropertyGroup>
    <TargetFramework>netcoreapp2.1</TargetFramework>
  </PropertyGroup>

  <ItemGroup>
    <PackageReference Include="Microsoft.AspNetCore" Version="2.1.1" />
    <PackageReference Include="Microsoft.AspNetCore.Mvc.Core" Version="2.1.2" />
    <PackageReference Include="Microsoft.AspNetCore.Mvc.Formatters.Json" Version="2.1.2" />
  </ItemGroup>

</Project>
This package includes a new extension method, AddJsonFormatters. We can use this to wire up support for JSON input and output using Json.NET.
public static void Main(string[] args)
{
    WebHost.CreateDefaultBuilder(args)
        .ConfigureServices(services =>
        {
            services.AddMvcCore()
                .AddJsonFormatters();
        })
        .Configure(app =>
        {
            app.UseMvc();
        })
        .Build()
        .Run();
}
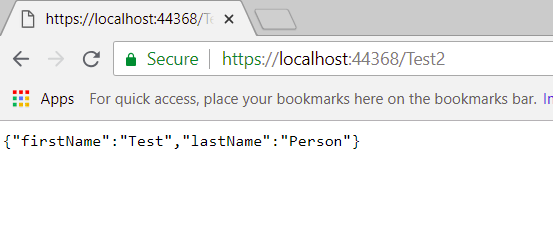
Now, if we restart our app, our /Test2 method works as expected.
Wrapping Up
With support for routing and JSON, we have the makings for a real API. With Attribute Routing and the new ApiController attribute, we have all the flexibility we could want to setup controllers, or route handlers, or whatever pattern we may want to follow for the app.
This is more than enough to implement a simple API, but before too long, you are you are going to encounter the need for things like Dependency Injection and Authentication. We will dive into those topics in future posts, so stay tuned.